

System Alerts
System Alerts let you define automated rules that monitor user activity and platform events, then notify your team when something important happens.
Alert Rules
Section titled “Alert Rules”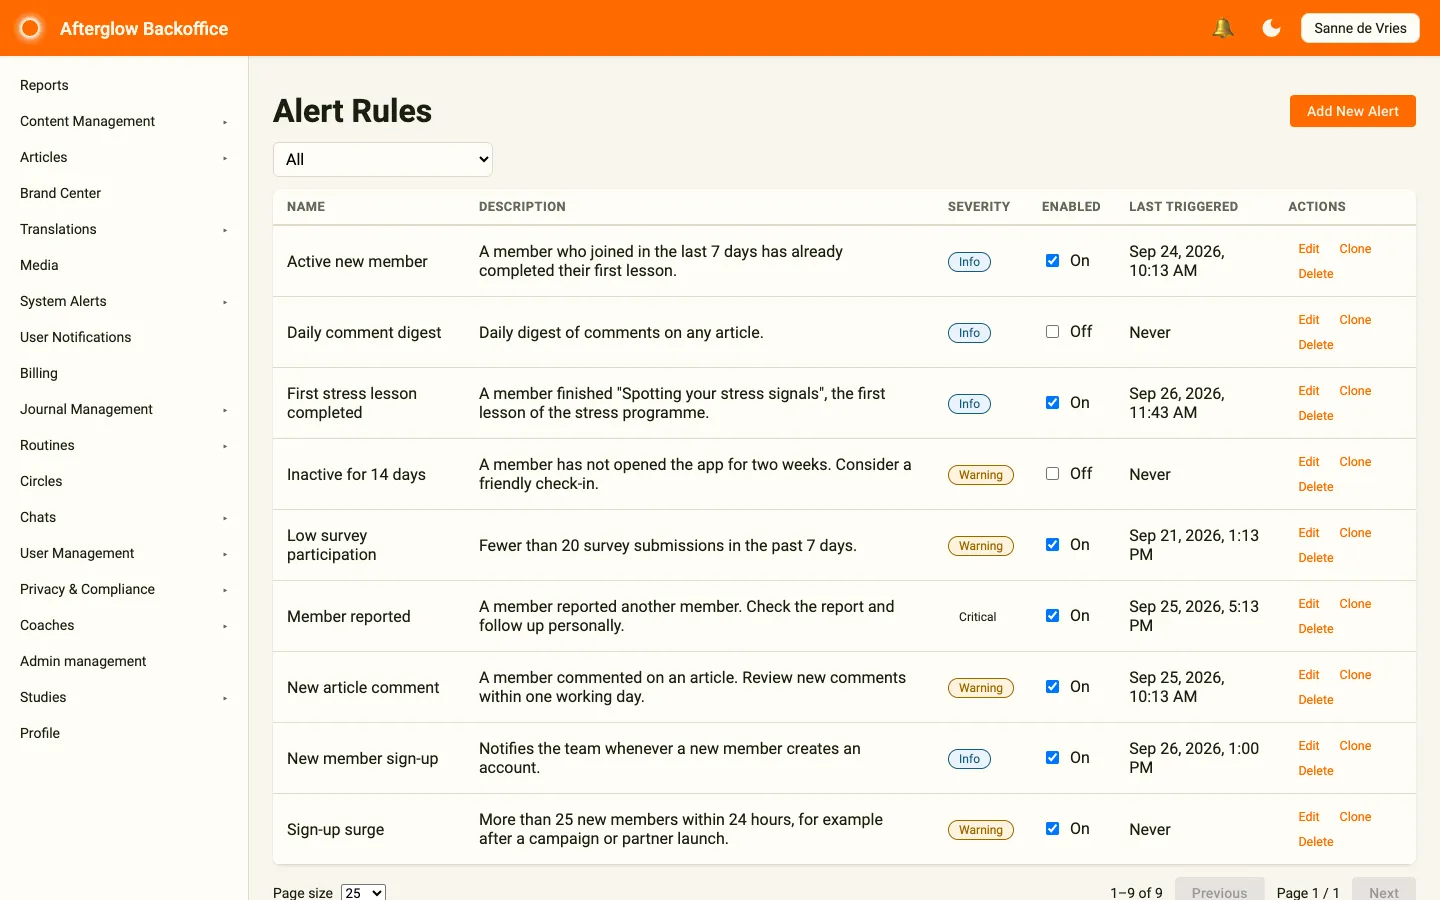
Open the rules from the sidebar by selecting System Alerts > Alert Rules. The page lists every rule configured for your workspace, sorted by name. The table displays:
- Name of the rule.
- Description (optional summary of what the rule monitors).
- Severity shown as a chip – Info, Warning, or Critical.
- Enabled – an On / Off toggle that lets you activate or deactivate a rule directly from the list.
- Last Triggered timestamp, or “Never” if the rule has not fired yet.
You can filter the list by severity using the dropdown above the table.
Each row has three actions:
- Edit – opens the rule for editing.
- Clone – creates a copy of the rule.
- Delete – permanently removes the rule after a confirmation prompt.
Click Add New Alert to create a new rule.
Creating and editing alert rules
Section titled “Creating and editing alert rules”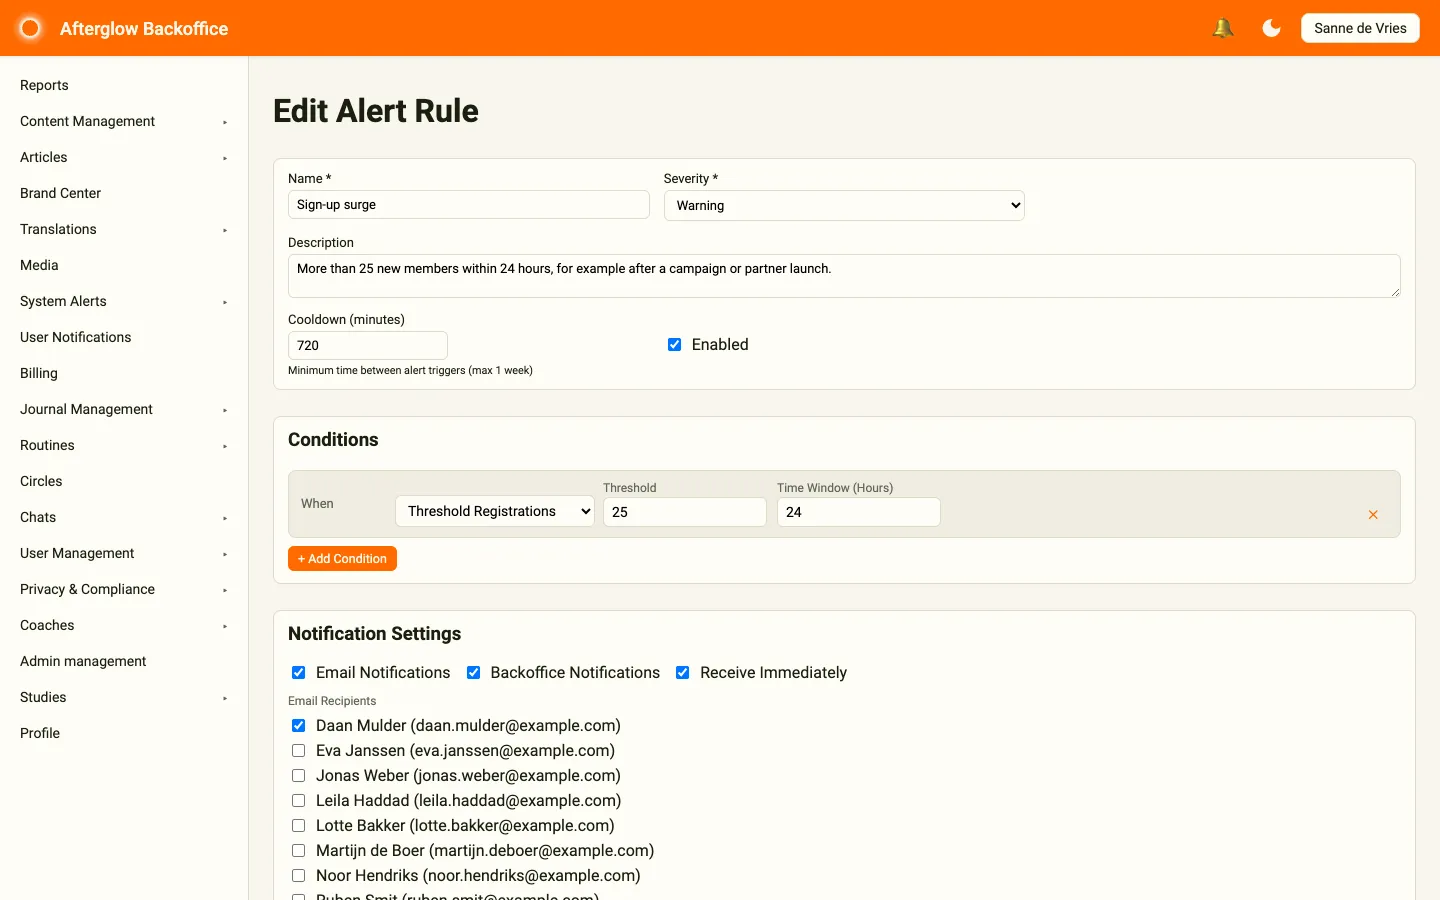
Clicking Add New Alert opens the New Alert Rule page; clicking Edit opens Edit Alert Rule. The form has the following fields:
- Name – a descriptive label for the rule (required, max 200 characters).
- Severity – choose Info, Warning, or Critical to indicate how urgent the alert is.
- Description – an optional longer explanation of the rule’s purpose (max 1,000 characters).
- Cooldown (minutes) – the minimum time that must pass before the same rule can trigger again. Set this to avoid duplicate alerts for recurring events. The maximum cooldown is one week (10,080 minutes).
- Enabled – check to switch the rule on.
Conditions
Section titled “Conditions”Every rule needs at least one condition. Conditions define what event or threshold triggers the alert. Click Add Condition to add a row, then choose a condition type (click the cross at the end of a row to remove it):
- User Completes Lesson – fires when a user finishes a specific lesson, or any lesson if you leave the lesson selector on Any Lesson.
- User Registered Days Ago – fires based on how many days ago a user registered. Enter the number of days.
- Comment on Article – fires when a comment is posted on a specific article, or on any article if you choose Any Article.
- User Inactivity Days – fires when a user has been inactive for the specified number of days.
- Threshold Registrations – fires when the number of new registrations reaches a threshold within a time window (in hours).
- Content Engagement – fires when a content engagement metric (Survey Submissions, Saved Articles, or Journal Messages) compared with a Threshold (≥, ≤, >, or <) matches within a window of days.
- User Registers – fires whenever a new user registers. No additional parameters are needed.
- User Reports User – fires whenever one user reports another. You can optionally enter a Reason (for example “spam”) to only fire for matching reports.
When a rule has more than one condition, you choose a logical operator (AND or OR) to combine each additional condition with the ones above it.
Notification settings per rule
Section titled “Notification settings per rule”In the Notification Settings section, you configure how your team is notified when this rule fires:
- Email Notifications – toggle email delivery on or off.
- Backoffice Notifications – toggle in-app notifications on or off.
- Receive Immediately – when enabled, notifications are sent as soon as the alert triggers. When disabled, they are grouped into a daily digest delivered every morning.
- Email Recipients – visible when email notifications are enabled. Check one or more administrators in the list. Only admins for your workspace appear in the list.
Click Save to save the rule, or Cancel to go back without saving.
Alerts
Section titled “Alerts”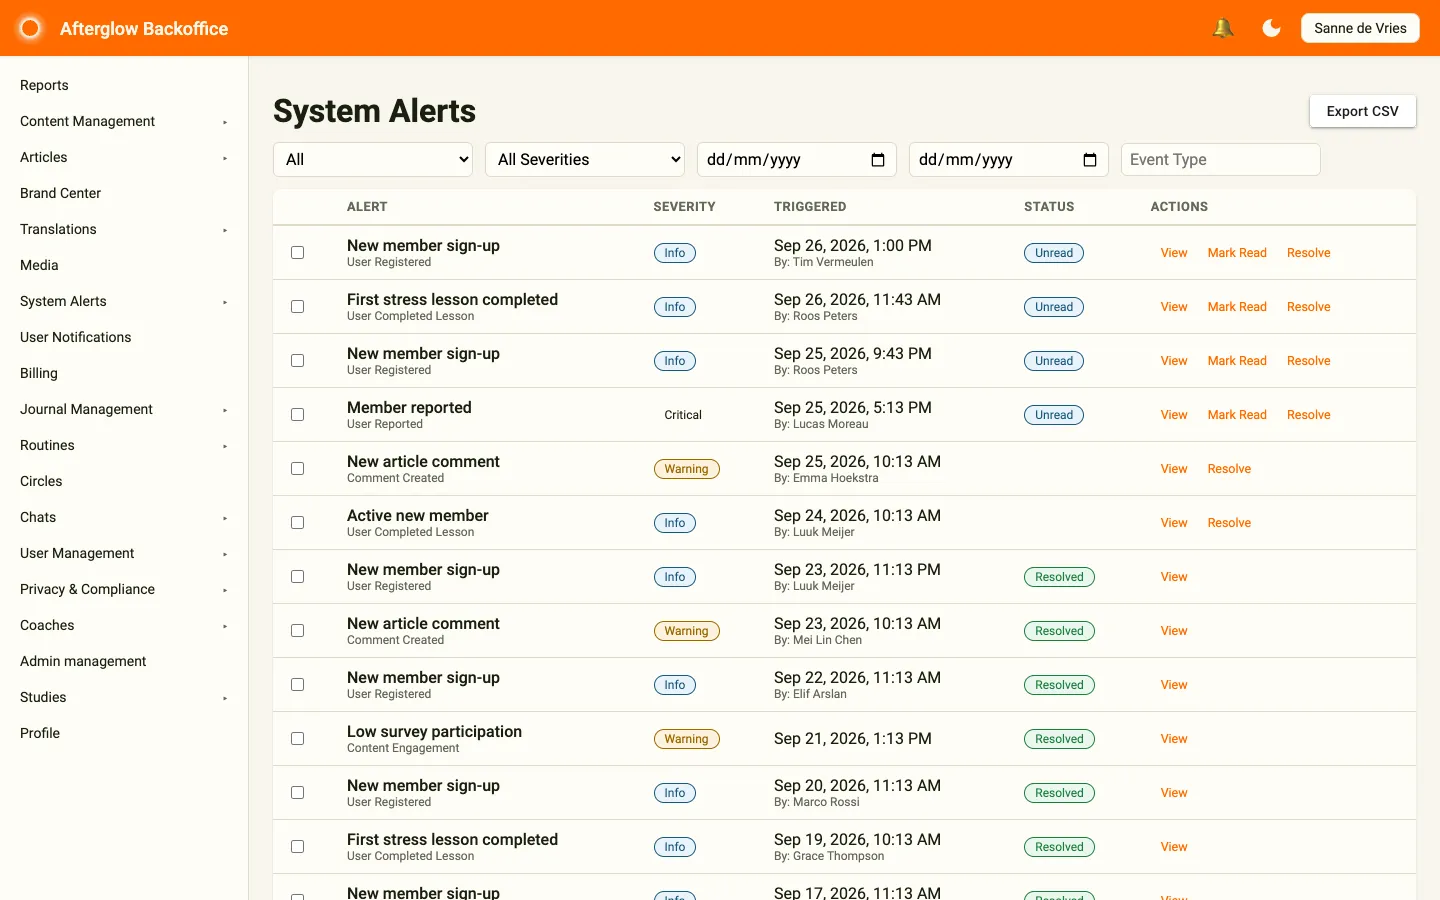
Open the triggered alerts from the sidebar by selecting System Alerts > Alerts. The System Alerts page shows every notification that has been triggered by your alert rules, newest first. Each row displays:
- Alert – the rule name and the event type.
- Severity – a chip showing Info, Warning, or Critical.
- Triggered – the date and time the alert fired, plus the name of the member who caused the event (if applicable).
- Status – an Unread chip for alerts you have not read yet and a Resolved chip for resolved alerts.
Filtering
Section titled “Filtering”Use the filter bar at the top of the page to narrow results:
- Status – All, Unread, Read, Resolved, or Unresolved.
- Severity – All Severities, Info, Warning, or Critical.
- Date range – pick a start and end date.
- Event Type – search by event type text.
The list updates as soon as you change a filter.
Bulk actions
Section titled “Bulk actions”Select one or more alerts using the checkboxes, then use the toolbar that appears above the list:
- Delete – permanently removes the selected alerts after confirmation.
- Mark as Read – marks all selected alerts as read.
- Mark as Resolved – resolves all selected alerts.
- Clear Selection – deselects everything.
Exporting
Section titled “Exporting”Click Export CSV to download a file containing the alerts currently shown in the list. The export includes the alert rule name, event type, severity, triggered timestamp, triggered-by user, and whether the alert is read and resolved.
Individual actions
Section titled “Individual actions”Each alert row has quick-action buttons:
- View – opens the notification detail page.
- Mark Read – available when the alert is unread.
- Resolve – available when the alert is not yet resolved.
Notification detail
Section titled “Notification detail”Clicking View opens the Notification Details page. The alert is automatically marked as read when you view it. Click Back to return to the list.
The detail page shows:
- Rule name and event type.
- Severity chip.
- Triggered At timestamp and Triggered By (the member or process that triggered it).
- Current status chips (Read/Unread, Resolved/Unresolved).
From this page you can:
- Mark as Resolved – closes the alert.
- Mark as Unresolved – reopens a previously resolved alert.
Notification data
Section titled “Notification data”The Notification Data section displays all details recorded with the event (for example, the member’s name, the lesson or article title, or other contextual information).
Alert rule information
Section titled “Alert rule information”The Alert Rule Information section shows the rule that generated the alert, including the rule name, description, enabled status, and cooldown setting. Click View Alert Rule to navigate to the rule’s edit page.
Status timeline
Section titled “Status timeline”The Status Timeline traces the alert through its lifecycle:
- Alert Triggered – shows when and by whom.
- Marked as Read – shown once the alert has been read.
- Resolved – shows when and by whom.
Preferences
Section titled “Preferences”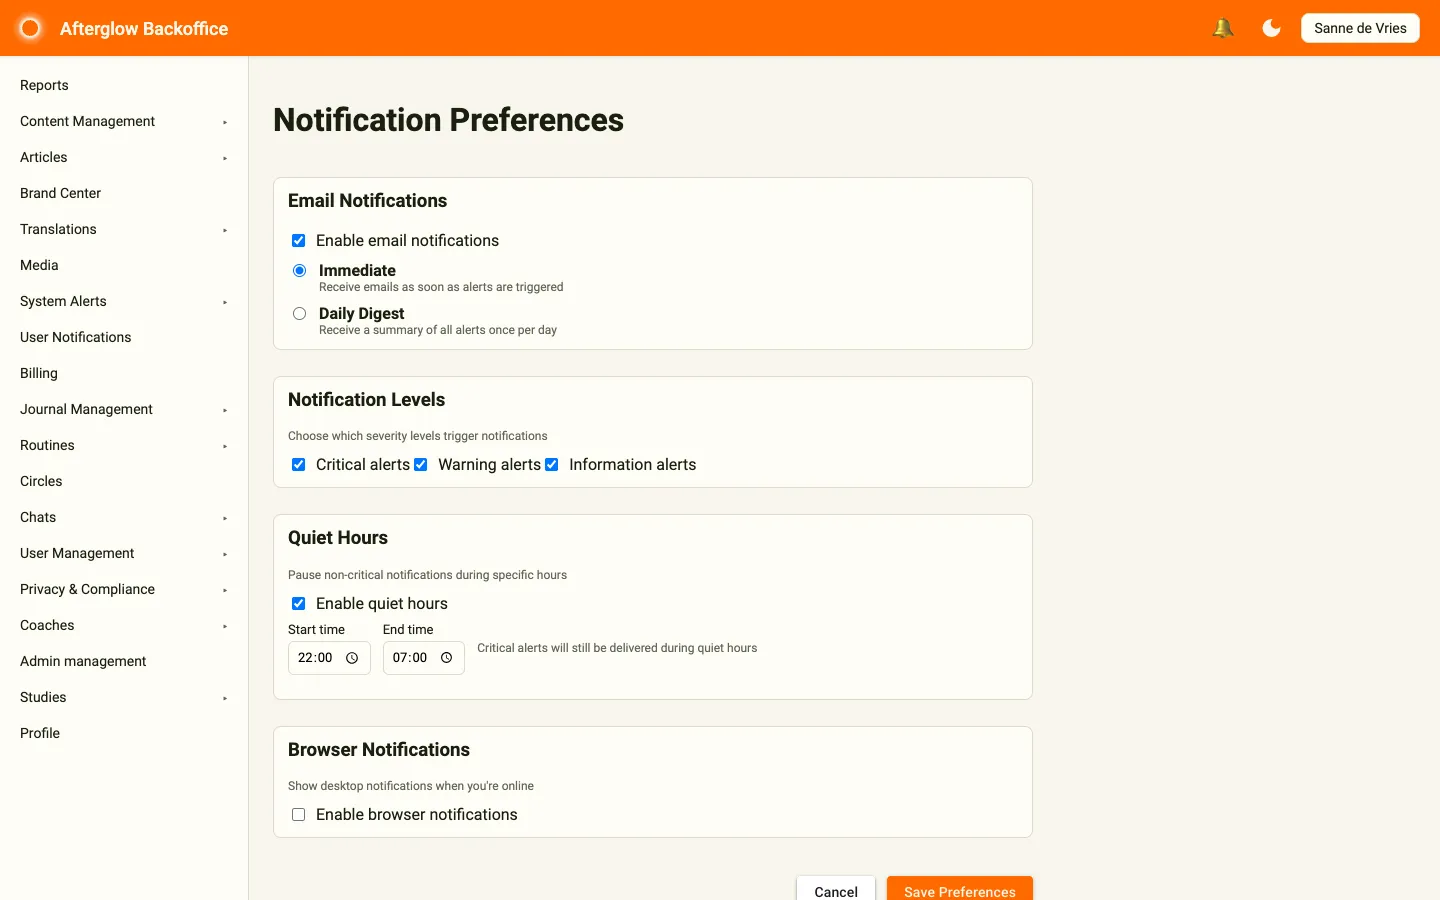
The Notification Preferences page (System Alerts > Preferences) lets you control how you personally receive alert notifications. These settings apply to your account only and do not affect other administrators.
Email notifications
Section titled “Email notifications”- Enable email notifications – master toggle for all alert emails.
- Immediate – receive an email as soon as each alert triggers.
- Daily Digest – receive a single summary email once per day.
The Immediate and Daily Digest options appear once email notifications are enabled.
Notification levels
Section titled “Notification levels”Choose which severity levels you want to be notified about:
- Critical alerts
- Warning alerts
- Information alerts
Quiet hours
Section titled “Quiet hours”- Enable quiet hours – pauses non-critical notifications during a time window you define.
- Start time and End time – set the window during which notifications are suppressed.
Browser notifications
Section titled “Browser notifications”- Enable browser notifications – shows desktop notifications when you are online in the Backoffice. If your browser has not granted permission yet, click Enable Browser Notifications to allow them.
- Play sound for critical alerts – plays an audio cue when a critical alert arrives. This option appears once browser notifications are enabled.
After adjusting your preferences, click Save Preferences to apply the changes, or Cancel to discard them.
Related topics
Section titled “Related topics”- Notifications and Alerts – How the alert engine and notification delivery work behind the scenes.