

My Practice
My Practice is where you manage everything about your coaching business on the platform — your profile, the services you offer, your bookings, and your integrations with external tools like Cal.eu and Stripe.
My Profile
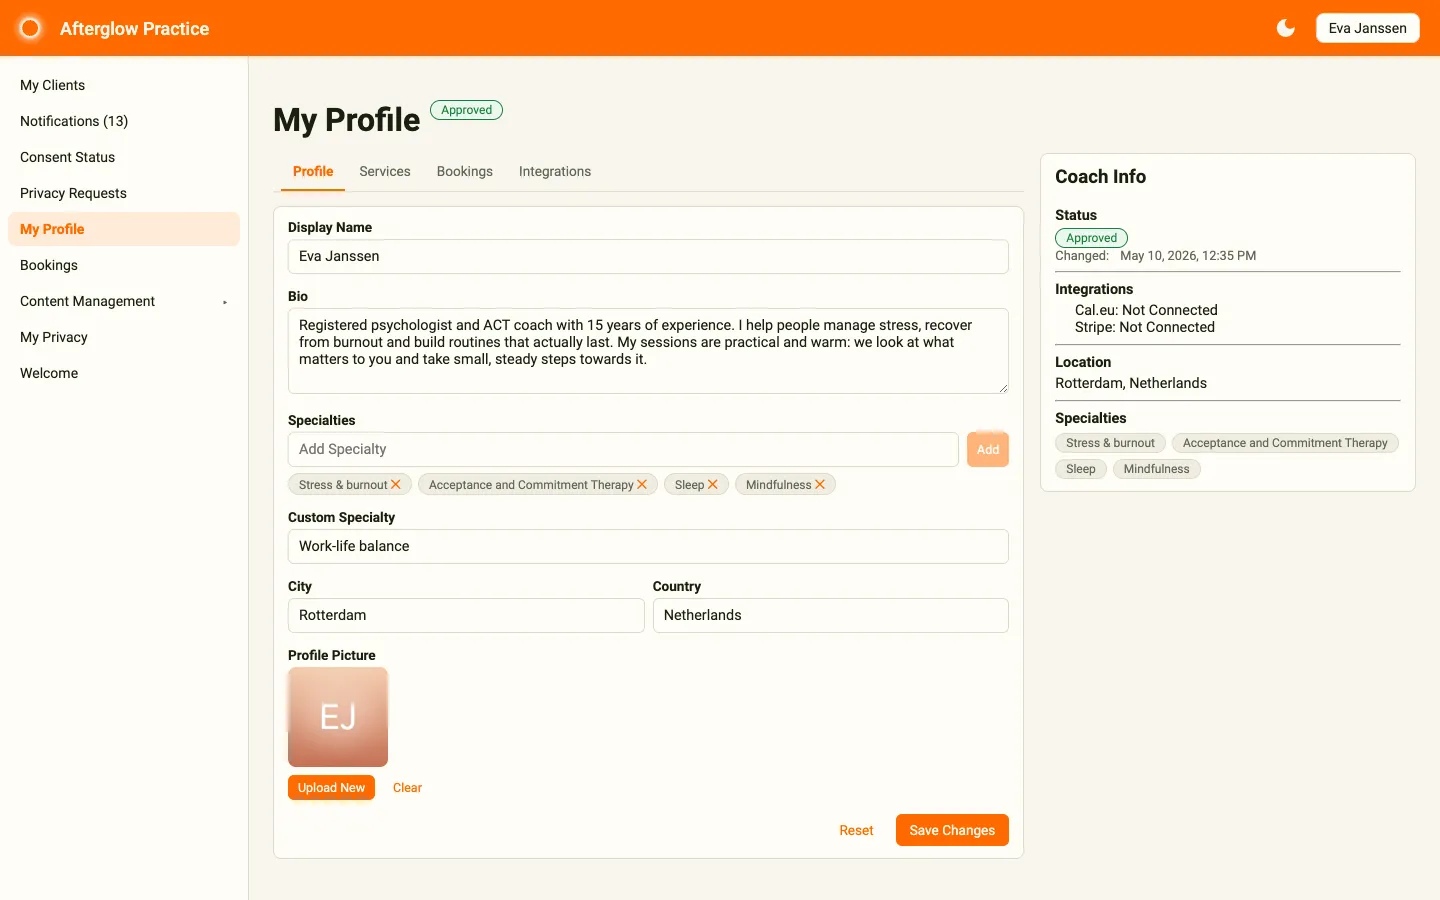
Section titled “My Profile”The My Profile page is the central hub for your coaching practice. It shows a status badge next to the page title and is organized into four tabs — Profile, Services, Bookings, and Integrations — with a Coach Info card on the right.
Status badge
Section titled “Status badge”Your profile shows a color-coded status badge that reflects your current approval state:
- Pending — Your profile is awaiting review by an administrator.
- Approved — You are visible to clients and can accept bookings.
- Suspended — Your profile has been temporarily disabled.
- Rejected — Your profile application was declined.
Only approved coaches appear in the coaching directory and can receive bookings.
Profile tab
Section titled “Profile tab”The Profile tab lets you edit your public-facing information:
- Display Name — Your name as it appears to clients (required).
- Bio — A free-text description of your background and approach.
- Specialties — Add tags that describe your areas of expertise (e.g. “Sleep”, “Mindfulness”). Type a specialty in the Add Specialty field and press Enter or click Add to create a chip. Click the ✕ on a chip to remove it.
- Custom Specialty — A free-form text field for describing a specialty that doesn’t fit into a single tag.
- City and Country — So clients know where you are based.
- Profile Picture — Click Upload New to upload a photo. Supported formats are JPG, PNG, GIF, and WebP (max 10 MB). Click Clear to remove the current photo.
Click Save Changes to persist your edits, or Reset to discard unsaved changes. Save Changes stays disabled while Display Name is empty.
Services tab
Section titled “Services tab”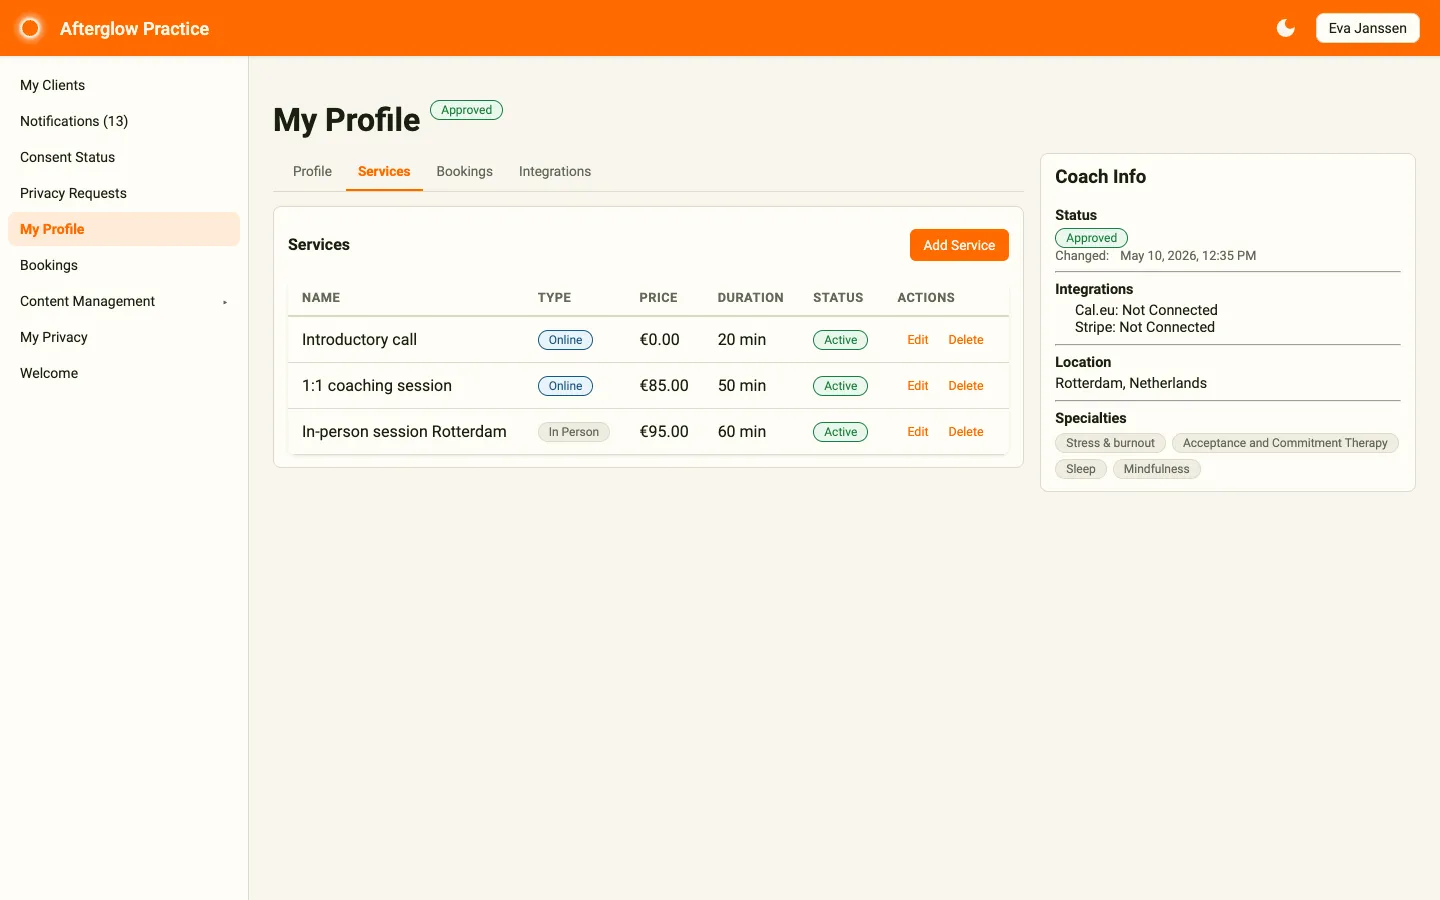
The Services tab shows all of your coaching services in a table with the following columns:
- Name — The service title.
- Type — Either “Online” or “In Person”, shown as a colored chip.
- Price — The price in EUR.
- Duration — Session length in minutes.
- Status — “Active” or “Inactive”.
- Actions — Edit and Delete buttons.
Adding a service
Section titled “Adding a service”Click Add Service to open a dialog with these fields:
- Name — The service title (required).
- Description — A longer explanation of what the service includes.
- Price (EUR) — The session price. If your workspace has a minimum price, it is shown under the field (for example “Minimum price: 50.00 EUR”).
- Duration (minutes) — Session length, between 15 and 480 minutes in 15-minute increments.
- Service Type — Online or In Person.
- Premium users only — When checked, only premium subscribers can book this service.
- Cal Integration — If you have a Cal API key configured, the Auto-create Cal event type checkbox is on by default and the platform creates a matching event type using the service name and duration. If you turn it off, enter a Cal Event Type ID and Cal Event Type Slug instead.
Click Create to add the service.
Editing a service
Section titled “Editing a service”Click Edit on any service row to open the Edit Service dialog. All fields from the creation dialog are available, plus:
- Active — Switch the service on or off without deleting it.
- Cal Event Type ID / Cal Event Type Slug — Update the linked Cal event type.
Click Save to apply your changes.
Deleting a service
Section titled “Deleting a service”Click Delete on a service row and confirm in the browser dialog. If the service has existing bookings, it will be deactivated instead of permanently deleted.
Bookings tab
Section titled “Bookings tab”The Bookings tab within your profile shows a table of your bookings with these columns:
- Scheduled — Date and time of the session.
- Service — The name of the booked service.
- Duration — Session length in minutes.
- Status — A color-coded chip: Pending (amber), Confirmed (blue), Completed (green), Cancelled (red), or NoShow (grey).
- Price — The booking price in EUR.
- Actions — A Cancel button appears for bookings that are still Pending or Confirmed.
Cancelling a booking
Section titled “Cancelling a booking”Click Cancel to open the Cancel Booking dialog. Enter a Cancellation Reason, then click Cancel Booking. The client will be notified of the cancellation.
Integrations tab
Section titled “Integrations tab”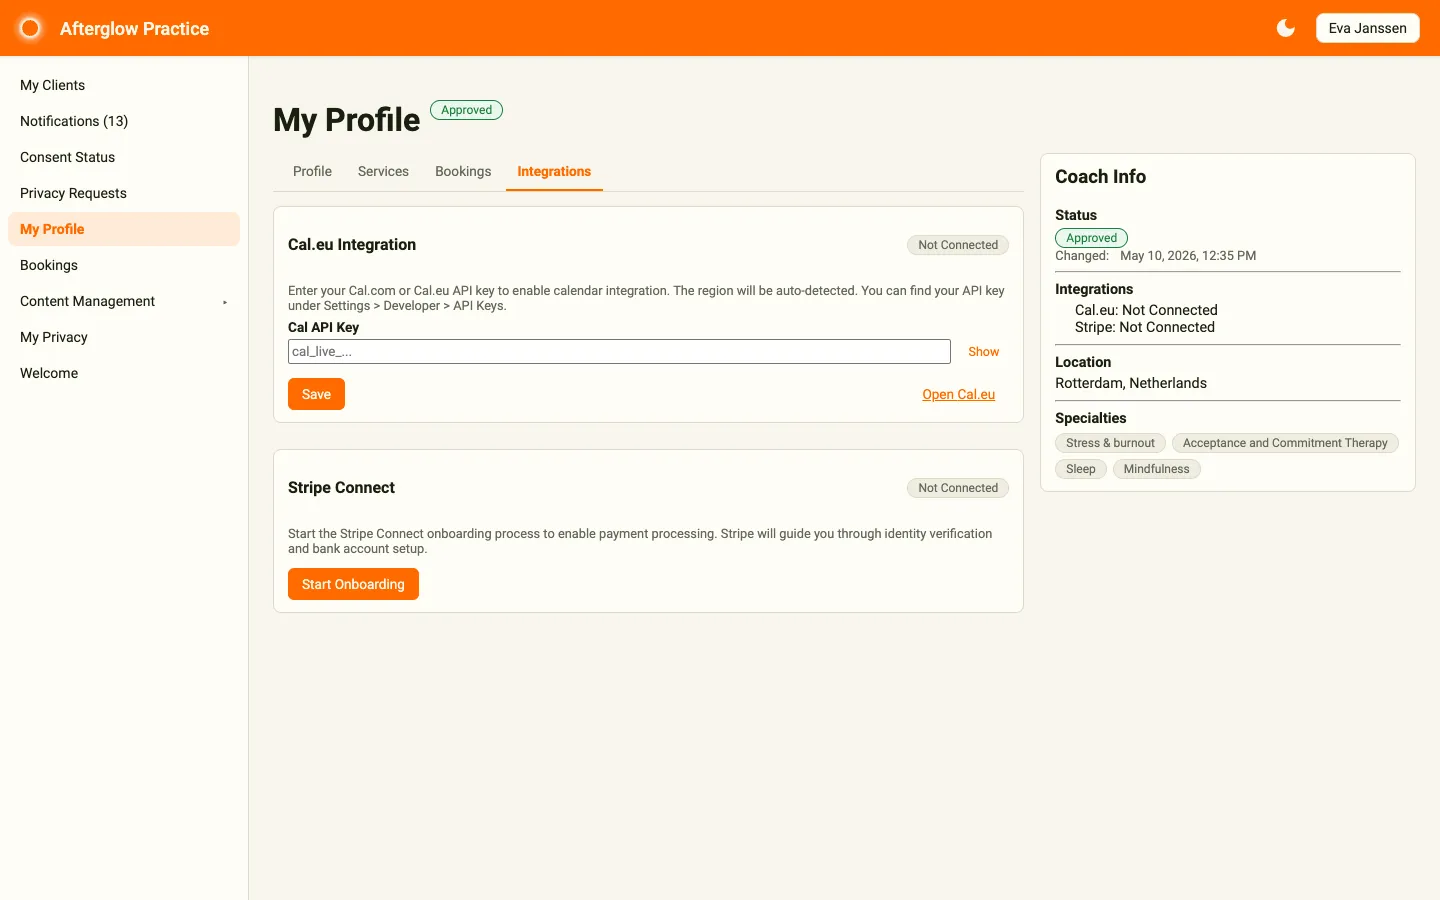
The Integrations tab contains two cards for connecting external services.
Cal.eu integration
Section titled “Cal.eu integration”Cal.eu handles scheduling and availability for your coaching sessions. The card title and the chip in its corner show the platform and whether you are connected — for example Not Connected or Connected (Europe). The platform works with both Cal.eu and Cal.com and detects the region from your key; for a Cal.com key the card is titled Cal.com Integration.
- Cal API Key — Enter your API key (a unique code from Cal.eu that connects your calendar). Find it in Cal.eu under Settings > Developer > API Keys. The key is masked by default; click Show or Hide to toggle it.
- Save — Saves the API key. A message confirms which region you are connected to.
- Clear — Removes the API key after you confirm. Calendar integration stops working until a new key is added. Only shown when connected.
- Open Cal.eu — Opens Cal.eu in a new browser tab.
Once connected, the card also shows:
- Webhook Status — Configured, Misconfigured, or Not Configured. If booking events are missing, they are listed below the chip.
- Create Webhook / Update Webhook — Sets up or repairs the calendar sync so booking events (cancellations, reschedules, etc.) are kept up to date. Hidden once the status is Configured.
Stripe Connect
Section titled “Stripe Connect”Stripe Connect handles payment processing so you can receive payouts for coaching sessions. A chip in the corner shows Not Connected, Action Required, or Connected.
- Start Onboarding — Creates a Stripe Express account and redirects you to Stripe’s onboarding flow, where you verify your identity and set up a bank account.
- Continue Onboarding — Appears when Stripe needs more information from you, together with the list of outstanding requirements. Clicking it returns you to the onboarding flow.
- Charges Enabled / Payouts Enabled — Once fully onboarded, two green chips confirm that your account can accept charges and receive payouts.
- Open Stripe Dashboard — Opens your Stripe Express dashboard in a new tab so you can review transactions and manage your account.
- Disconnect — Removes the Stripe account link after you confirm. Payment processing stops until a new account is connected.
Coach Info sidebar
Section titled “Coach Info sidebar”The sidebar card on the My Profile page provides a quick summary of your coaching practice:
- Status — Your current status badge and the date of the last status change. If the change came with a reason, hover over the ⓘ icon to read it.
- Integrations — Cal.eu and Stripe, each marked Connected (with a green dot) or Not Connected.
- Location — Your city and country, or Not specified if not set.
- Specialties — Your specialty tags displayed as chips.
Bookings page
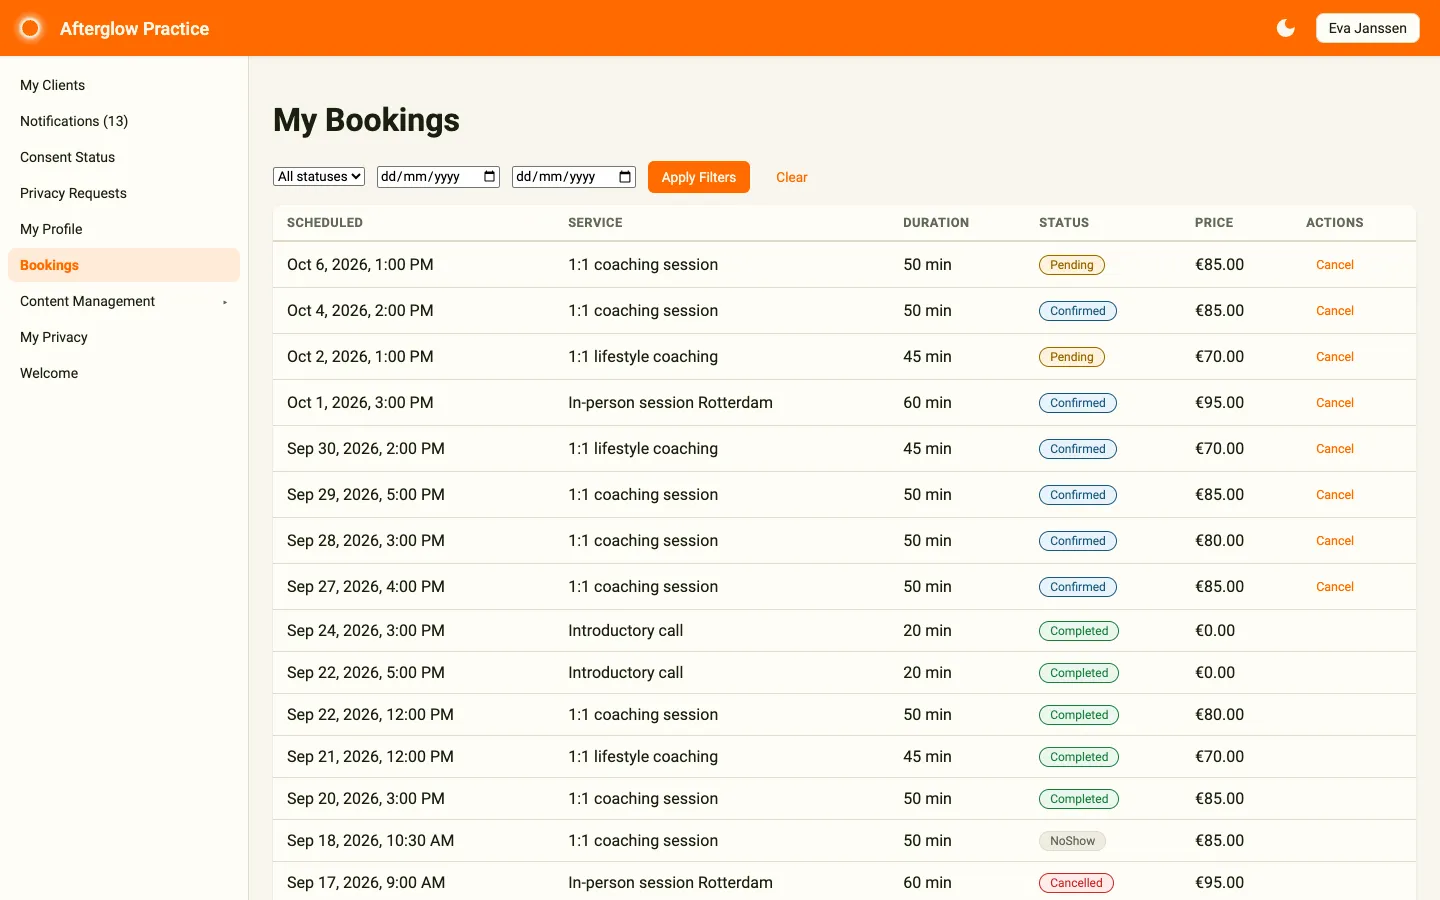
Section titled “Bookings page”The Bookings page provides a focused view of bookings with filtering capabilities.
Filters
Section titled “Filters”A filter bar at the top of the page offers:
- Status — Filter by booking status (Pending, Confirmed, Completed, Cancelled, NoShow), or pick All statuses.
- From / To — Date pickers to narrow results to a specific time range. The To date is included.
- Apply Filters — Applies the selected filters.
- Clear — Resets all filters and reloads the full list.
Role-based visibility
Section titled “Role-based visibility”- Coaches see only their own bookings. The page title reads “My Bookings”.
- Admins see bookings across all coaches. The page title reads “All Bookings” and an extra Coach column appears in the table, linking to the coach’s detail page.
The table columns match those on the Bookings tab (scheduled time, service, duration, status, price, actions), with the addition of the Coach column for admins.
All Coaches page
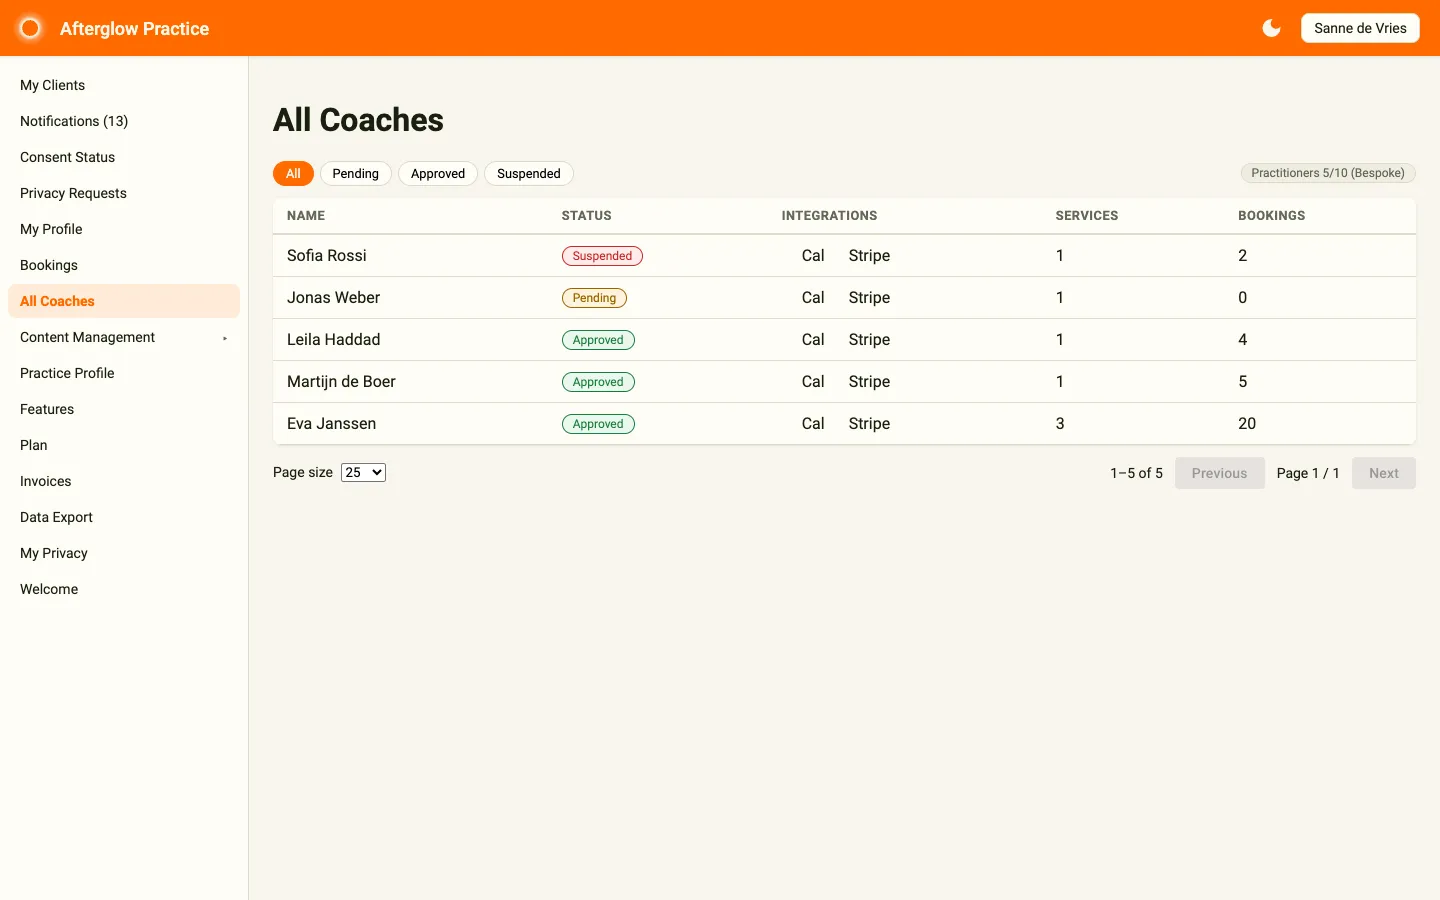
Section titled “All Coaches page”The All Coaches page is available to the Admin role only. It provides an overview of every coach in your workspace.
Status filter chips
Section titled “Status filter chips”A row of chips at the top lets you filter coaches by status:
- All — Shows every coach.
- Pending — Coaches awaiting approval.
- Approved — Active coaches.
- Suspended — Temporarily disabled coaches.
On the right, a chip shows how many practitioner seats your plan uses, for example Practitioners 5/10 (Bespoke).
Coaches table
Section titled “Coaches table”The table displays one row per coach with these columns:
- Name — The coach’s display name.
- Status — A color-coded status badge.
- Integrations — Cal and Stripe, each with a dot that is green when connected and grey when not.
- Services — The number of active services.
- Bookings — The total number of bookings.
Click any row to open the coach’s detail page. It is read-only and shows the coach’s Profile (photo, bio, and custom specialty), their Services, and their Bookings, together with the same Coach Info card as My Profile. Click ← Back to return to the list.
Related topics
Section titled “Related topics”- Coaching — How the coaching marketplace works, including services, bookings, consent, and payments.
- Practice Overview — Introduction to Practice and the consent model.
- Coaches (Backoffice) — Managing coaches from the administrator’s perspective.